LEARN AT YOUR OWN PACE
User Guide
From your first import to your finished video. Choose a topic for step-by-step help, right here on the website.
8 chapters · Step-by-step editing tasks · Read online, with no PDF viewer needed.
Based on the ArtsyCut Desktop 2.0.1 guide. Available controls may vary in the browser and customer editions. Automation chapters include features limited to the private owner-preview build.
CHAPTER 01 OF 08
Start here
First launch, workspace and your first export.
How to edit video offline on Windows with ArtsyCut
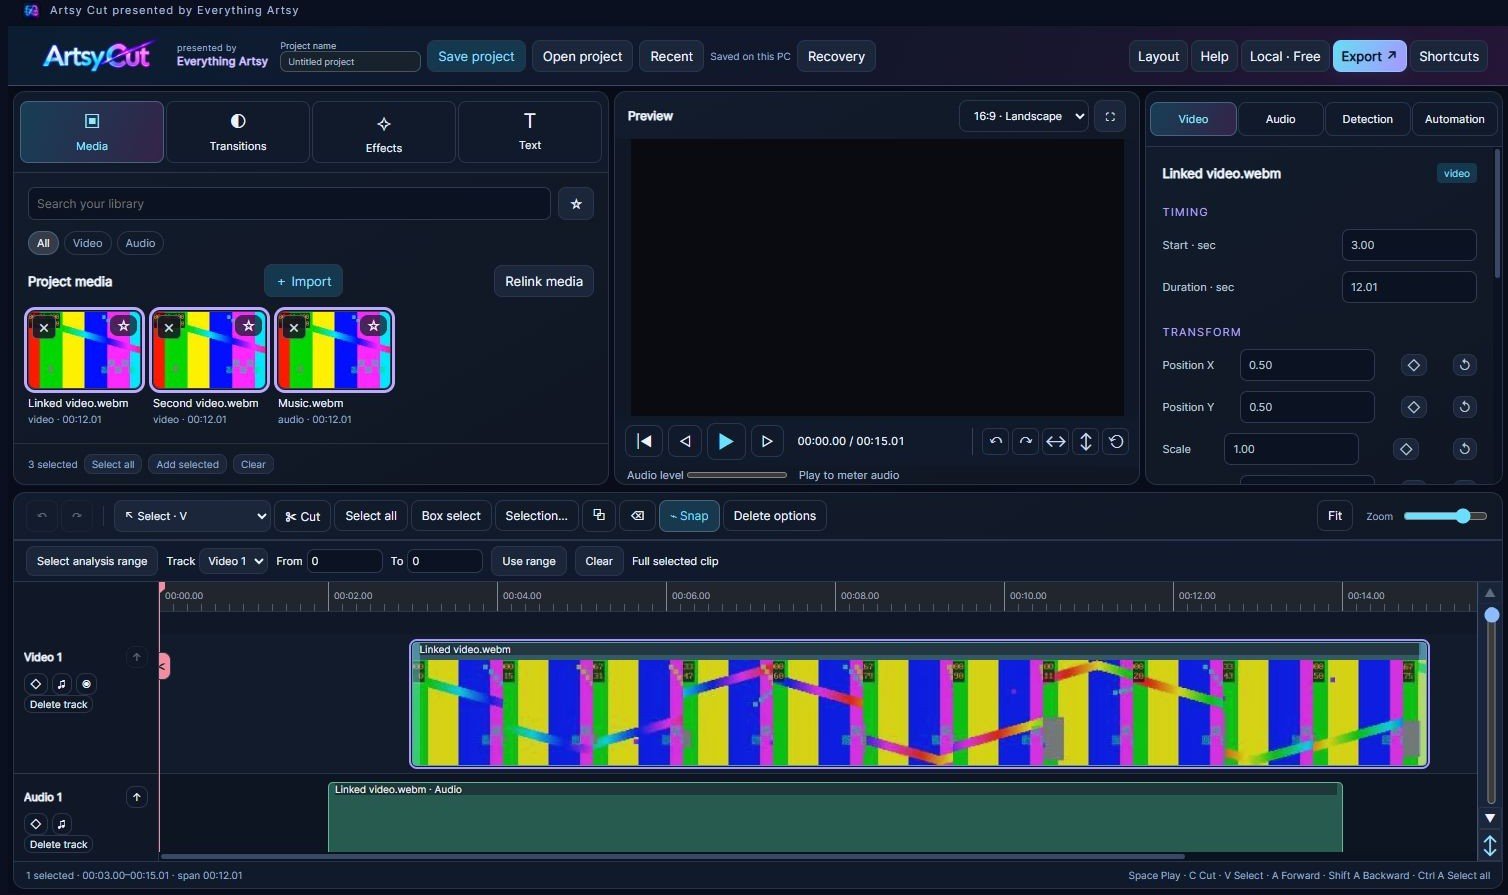
- While online, download ArtsyCut for Windows. Extract the entire ZIP, open ArtsyCut.exe in the ArtsyCut folder, and sign in.
- Keep your source videos on the computer. Open a project and import a local clip. Save the project before disconnecting.
- Offline, place the clip on a video track. To automate a first cut, open ArtsyCut Auto, choose a clip or the full source, choose pacing and run the analysis. The local engine creates a separate editable project with source audio muted.
- Preview the cuts, adjust the timeline, and export. Reconnect periodically for Pro plan checks.
First launch
Open the app and begin with confidence.
- Launch ArtsyCut from your shortcut or application folder. After an update, save and close the previous app, then reopen it.
- If the customer edition requests sign-in, use your ArtsyCut account in the browser and approve the code shown by the app. Return when the editor opens.
- Begin with a new project. To continue existing work, choose File > Open project or File > Recent.
- Keep original footage in a stable folder on this computer. You will need those files for preview and export.
An empty editor is normal. Your next step is to import footage.
Meet your workspace
Five areas keep the editing workflow organized.
- Left: Media, Transitions, Effects, and Text contain the assets you can use.
- Center: Preview shows playback, framing, and on-screen adjustments.
- Right: select Video, Audio, Detection, or Automation. Select a timeline clip first to see its settings.
- Bottom: arrange clips, trim edges, layer tracks, and move the cut line.
- Top: File holds project commands and Settings. Save sits beside the project name. Layout and Export are on the right.
Selecting a clip tells ArtsyCut which object you want to change.
Your first successful export
A simple practice edit from import to finished video.
- Create a new project. Open Media, click + Import, and choose one short recording.
- Drag its media card onto Video 1. Press Space to play, then Space again to pause.
- Move the cut line to an unwanted section. Choose Cut and click the clip at each boundary. Return to Select, select the unwanted piece, and press Delete. Close the resulting gap if needed.
- Click Save. Choose a project name and folder, then check the saved status.
- Click Export, choose an available size, and select Create video. Wait for completion and play the exported file to check picture and sound.
You now have an editable project and a separate finished video.
CHAPTER 02 OF 08
Projects & media
Save, recover, import and organize.
Create, name, and open projects
Keep each editing job separate and recognizable.
- Save the current project before switching. Choose File > New project for a separate edit.
- Click the project name in the top bar and give it a useful name, such as Painting tutorial - first cut.
- Use File > Open project to load a project file from disk. Reconnect its original media if requested.
- Point to File > Recent to open the flyout, then choose a saved project. Unsaved projects do not appear in that list.
The centered project name identifies the edit you are currently working on.
Save, Save as, and recovery
Protect work before experimenting.
- Click Save for the first file save. Choose a name and location and complete the dialog.
- After the first save, Save or Ctrl+S updates that same file. Use the arrow beside Save > Save as to make a separate copy.
- Check the status beside the project name. A recovery copy is not the same as saving your project file; unsaved file changes still need Save.
- After interrupted work, choose File > Recovery. Review the available copy, then save the recovered work under a clear name.
- Before a major experiment, use Save as to keep an earlier version you can return to.
A completed file save closes its dialog and updates the saved indicator.
Folders, settings, and properties
Choose where files go and how the project is configured.
- Open File > Settings. Choose project frame rate, landscape or portrait format, and canvas background. Apply settings when ready.
- In Save locations, use Choose folder for Projects, Recordings, and Exports.
- Enable Ask each time when you want to choose a destination for each save. Disable it to use the remembered location.
- Open File > Properties for project details. Right-click a timeline clip or media card and choose Properties to inspect that item.
You can identify a file and its destination without leaving the editor.
Import and organize media
Bring recordings, images, and sound into the library.
- Open Media and click + Import. Select the video, image, or audio files you want.
- Wait for the media cards. Thumbnails and waveforms may continue preparing in the background.
- Use the library search, filters, and favorite stars to find items.
- Click a card to select it, or drag a box across the media area to select several. Use the selection actions as needed.
- Drag a card to the timeline, or double-click to add it using the normal placement behavior.
Imported assets are ready to place on the timeline.
CHAPTER 03 OF 08
Timeline editing
Select, trim, snap, scrub and arrange.
Arrange and layer tracks
Build the order of your edit and its visual hierarchy.
- Drag a clip left or right to change when it plays. Check the placement preview before releasing.
- Drag upward into the receiving space to create a higher video track. Drop in an existing row when you do not want a new track.
- Keep base footage on Video 1. Higher video tracks cover lower footage wherever their visible clips overlap.
- Put audio-only files on audio tracks below the video tracks. Overlapping audio mixes; one track does not automatically silence another.
- Use track lock, mute, and visibility controls to protect or isolate work. Delete track removes that track and its contents.
The placement preview should show the intended destination before you commit.
Select, move, and delete
Work on one clip or an entire group.
- Click a clip to select it. Shift-click to extend selection, or drag a box from empty timeline space across clips.
- Use Select all for the timeline. Inspect the highlighted selection before deleting or moving.
- Drag one selected clip to move the selected group. Linked audio follows until it is unlinked.
- Press Delete or use the right-click menu. Open Delete options when you need to choose between leaving and closing a gap.
- Use regular Undo immediately if the result is wrong. Unlock tracks before changing their contents.
Only the intended clips should be highlighted before a group edit.
Scrub, zoom, and track height
Find the moment you want without losing your place.
- Press Space to play or pause. Drag the cut line itself or drag across the ruler to scrub.
- Grab near the line: its selectable area is wider than the visible line. It highlights while dragging.
- Use Zoom minus, slider, and plus to change the time scale. Use Fit to recover the whole-project view.
- Use the mouse wheel over the timeline or the right scrollbar to scroll tracks vertically.
- Use the height grip beside the vertical controls to resize track rows. Zoom affects time; track height affects row size.
Scrubbing moves playback position, not your clips.
How to trim and split video clips in ArtsyCut
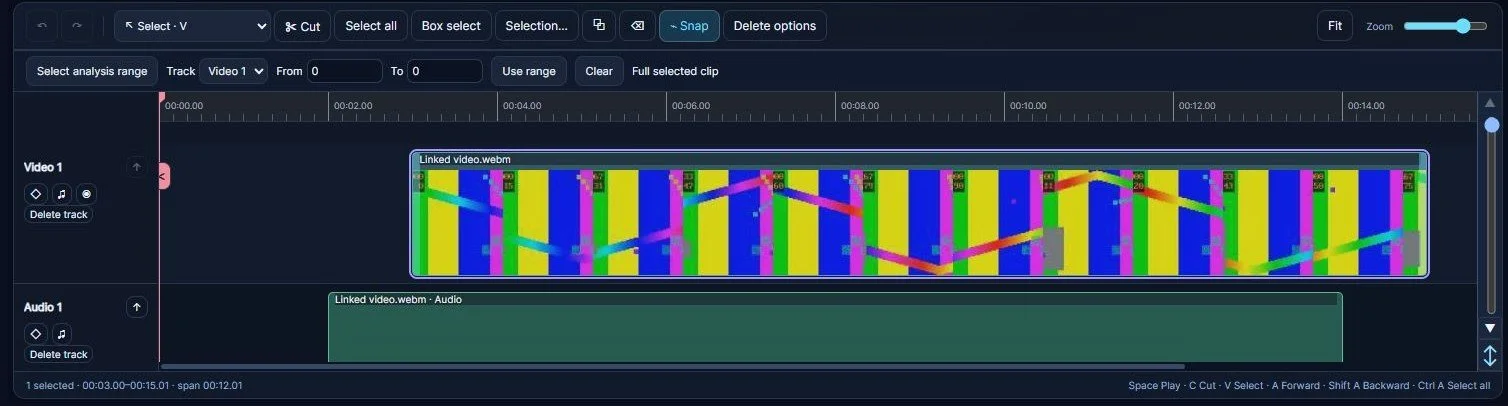
Use these steps for a manual cut or to refine an automated first cut. Import a video, place it on a timeline track, and select the clip. Open the browser editor.
- Select a clip and approach its outside edge. Drag the trim bracket inward to shorten it or outward to restore available source footage.
- Watch Preview during the trim. You cannot extend beyond the source-file boundary.
- Choose Cut, then click inside the clip at the intended split. Return to Select before moving or deleting a resulting piece.
- Keep Snap on to align timing with nearby edges. Watch the colored snap guide before releasing.
- Hold Alt during a move or trim to bypass snapping temporarily. Play across the join afterward.
You should be able to play through the revised join without unintended dead time.
Close gaps deliberately
Control when later footage should move.
- Click an empty gap between clips. When the gap highlight appears, click its X to close that gap.
- For deletion, open Delete options and choose whether to leave a gap or close it.
- Before ripple changes, check linked audio, overlays, and locked tracks.
- Play through the result and inspect nearby titles and sound. Undo if the timing no longer matches your intent.
Close gaps for continuous playback; keep gaps when their timing is intentional.
CHAPTER 04 OF 08
Picture & sound
Keyframes, color, titles, effects and audio.
Rotate, mirror, and frame
Correct recording orientation before styling the shot.
- Select a video. Use the compact rotation and mirror buttons below Preview to correct a sideways or reversed recording.
- Open Video > Basic for position, scale, rotation, opacity, and blend controls.
- Click the object in Preview to reveal handles. Drag to position it; use a corner to scale while preserving its aspect ratio.
- Use centering and alignment guides, or enter exact values on the right.
- Change landscape/portrait format through project Settings or the format selector, then check framing throughout the clip.
Preview and the numeric settings should describe the same adjustment.
Animate with keyframes
Change a property over time.
- Select a clip and open Video > Animation. Place the cut line where motion should begin.
- Set a starting value and click its diamond. Use the Transform master diamond to key all transform properties together.
- Move later in the clip and change the keyed value. This creates or updates its value at that time.
- Play between the points. Use previous/next keyframe buttons to jump between keys.
- Drag a timeline diamond to change timing. Right-click it for deletion options. Use Undo if you move the wrong point.
The editor interpolates between your keyed values.
Adjust speed
Accelerate process footage or slow a moment.
- Select a video or audio clip and open Video > Speed.
- Change Playback speed with the slider or number. A value of 1 is normal source speed; a higher value plays faster.
- Decide whether Ripple following clips should move later clips on the same track as duration changes.
- Check the linked audio and the next join. Preview from before the change through the following section.
- Use Undo to compare the earlier timing before deciding what to keep.
The revised timing should still make the action understandable.
Color and custom presets
Build a consistent look with precise controls.
- Select a video or image and open Video > Color. Expand Color or Light.
- Use Temperature, Tint, Vibrance, and Saturation for color. Exposure, Brightness, Contrast, Highlights, Shadows, Whites, and Blacks adjust tone.
- Explore with sliders or type a number. Compare original bypasses color adjustments; Enable color restores them.
- Use a property diamond to animate a value, or Keyframe color / Keyframe light for a group. Reset arrows return properties to neutral at the playhead.
- Choose Save preset, name the look, then apply it to another clip through Color presets.
Compare before and after before applying a stronger correction.
Add and style titles
Place readable words over your footage.
- Open Text in the library and drag a preset to a video track above the footage. Check the drop preview.
- Select the title and edit Content. Use Edit in Preview or double-click visible text for direct wording changes.
- Choose font, size, weight, alignment, color, outline, and shadow. Position with Preview handles or transform fields.
- Trim the title clip to control its appearance time. Play the beginning and ending to check readability.
- Use Styles and attributes to save a personal preset or copy selected attributes to another title.
Your words should remain readable at the final output size.
Transitions and effects
Make joins and visual treatments intentional.
- Open Transitions and hover an asset to preview it. Drag to a join for a cut transition or toward an edge for an edge transition.
- Check placement before releasing. When replacing a transition, watch for the replacement preview.
- Select or move the transition block; use its handles or duration controls to adjust length.
- Open Effects and drag an effect as a separate strip, or inspect applied effects under Video > Effects.
- Adjust intensity and available mask settings. Use Bypass to compare, Remove to delete, and Reset effect to restore defaults.
The transition or effect should support the action rather than obscure it.
Audio, waveforms, and linking
Keep picture and sound aligned.
- Select a clip and open Audio. Adjust Volume, Fade in, and Fade out.
- Use waveforms to locate likely speech, silence, or impacts. Zoom in, then listen before cutting.
- Video audio stays attached unless separated. Right-click the video and choose Unlink audio to move sound onto an independent audio track.
- Add music or audio-only files to audio tracks. Listen to overlapping tracks together; both may be audible.
- Use the volume diamond for changes over time. Mute a track to isolate another sound while reviewing.
A waveform helps locate an edit; listening confirms it.
Record screen or audio
Capture material directly from ArtsyCut.
- Click Record beside Import. Choose Screen or window, or Audio only - add to timeline.
- Select the screen/window and optional computer audio or microphone. For voice recording, choose the microphone.
- Choose a recording folder, then Start recording. Make a brief test before a long take.
- Hide controls when presenting. A movable pulsing recording indicator remains. Press Escape to stop while hidden, or use Stop & save.
- Wait for saving and import. Screen recordings enter Project media. Audio-only recordings also land on an audio track at the starting cut-line position.
The recording should appear in media after completion.
CHAPTER 05 OF 08
Detection
Find and review footage to remove.
Detection: scope and work zone
Tell the local engine where to look.
- Select a video clip and open Detection. Correct rotation first so the work area appears as intended.
- To scan only part, use Select analysis range. Select the track and drag the range, or enter From / To and Use range. Verify the displayed scope.
- Choose Draw zone and drag a box over meaningful work in Preview. For a tabletop tutorial, include the hands and object.
- Turn drawing off to move a zone. Choose Whole frame if the entire image matters, or Clear zones to start again.
- Check the visible zone and selected range before pressing Auto Trim.
Only the intended area and time range should be analyzed.
Detection: review and remove
Turn suggestions into an editable first cut.
- Click Auto Trim and watch its progress and status. Cancel analysis if the scope needs changing.
- Review orange suggestions for idle footage and purple Clean-Up suggestions for short leftover fragments.
- Under Preview options, toggle Skip orange suggestions and Skip purple suggestions to audition the proposed result. These switches do not remove footage.
- Use Delete proposed for orange removals or Clean-Up for purple removals. Check their totals: the actions can affect proposals across the timeline.
- Play the revised joins. Undo a removal if needed. Clear all proposals discards suggestions without removing more footage.
Previewing suggestions and applying removals are different actions.
Detection: refine your settings
Compare settings on the same sample.
- If useful work is marked, tighten the work zone and test a smaller range first.
- Adjust the available Auto Trim profile and sensitivity/aggressiveness settings, then rescan the same sample.
- In Advanced detection controls, choose Work zone, Hands, or Person as appropriate. Use Motion / hands / person or Content only for a specific analysis.
- Tune minimum durations, retained edge padding, and Clean-Up minimum cautiously.
- Use Multiple clips > Auto Trim all video clips after testing. Review each clip's saved settings and proposals.
Change one setting at a time so you can judge its effect.
CHAPTER 06 OF 08
Automation
On customer Windows builds, ArtsyCut Auto analyzes your selected footage locally and opens an editable first cut. See the Windows walkthrough. The example-trained AI Auto Edit, ChatGPT connection, and Create a Short instructions below apply to the private owner preview.
Desktop app only · Some AI features are private owner-previewConnect ChatGPT
A guided setup for the private owner-preview AI integration.
- Open Automation > AI Auto Edit, then Editing style & connection. Find Connect ChatGPT.
- If Codex is missing, choose Download Codex. Install and open it from the official site, then return to ArtsyCut.
- ArtsyCut checks for installation automatically. Use Check connection or Try again when needed.
- Choose Sign in and complete OpenAI sign-in in the browser. Wait for ArtsyCut to verify Connected.
- Choose Continue. Use Manage connection to disconnect or change account. Set up later leaves setup without blocking local editing.
ArtsyCut account access and ChatGPT access remain separate.
Save examples and calibrate
Prepare a reusable editing profile.
- Open Editing style & connection. Add two or three example videos in total, using separate YouTube-link fields or local video files.
- Check each link. A valid-link check confirms format, not that YouTube permits the video to be read.
- Describe the intended style in What should the edit learn? Use Advanced editing options for slow-work speed-up and optional section-by-section AI review.
- Choose Save setup, then Calibrate. Watch progress and read the saved profile and limitations.
- Calibration is reused. Change an example and save setup to enable recalibration; merely reopening Automation should not repeat it.
Calibration does not mean every frame of each example was watched.
Run AI Auto Edit
Choose the footage and the types of change.
- Choose Tutorial for visual-work downtime or Talking head for silence-led editing with style adjustments. Confirm calibration is ready.
- Select an analysis range for a targeted pass or use the intended full footage. Verify the scope when prompted.
- Adjust Downtime cut aggressiveness and Match example style. Test a short area before a long run.
- Click ArtsyCut Auto. Select Cuts, Timing & speed, and/or Keyframes & transitions in the pass dialog.
- Watch progress and review results. Use the live-editing menu option to follow changes as they happen.
Run only the passes you need instead of repeating cuts unnecessarily.
Review and undo automation
Keep useful changes and reverse the rest.
- Read the latest-run tally for edit count and time removed. Use project totals for tracked cumulative changes.
- Play through cuts, speed changes, and animated sections. Check that purposeful activity and final results remain clear.
- Use regular Undo for the most recent individual edit.
- Use the dedicated automation undo control for the latest Auto Edit run. Undo newer manual changes first when required.
- Use the automation redo control to restore the next undone run. Save a separate project version before further experiments.
Per-run statistics and cumulative totals answer different questions.
Create a Short from your edit
Preserve retained footage and accelerate the process.
- Finish your first cut and save. Open Automation > Create a Short.
- Confirm Source: edited video timeline. The short uses retained timeline cuts and layers, not the original unedited file.
- Set Desired length from 1 to 5 minutes; default is 2:30. Choose original framing or vertical format.
- Click Create a Short. Local samples suggest a middle highlight; process sections accelerate while opening, highlight, and ending retain their edited speed.
- Review sections and limitations, then Open editable short. Save it and inspect framing, transitions, and sound.
The source project is preserved. Short creation does not call ChatGPT.
Undo and redo a Short
Switch safely between the source and generated result.
- After opening a generated short, use Undo All in Create a Short to return to the project before that short was created.
- The short is saved before switching. Edits made to it are retained for the corresponding redo.
- Use Redo All to restore the last undone short. Check the project name after each switch.
- Use regular Undo/Redo for individual edits in the current project.
- Save both versions before closing. Shorts Undo All / Redo All history is available during the current app session.
Undo All reverses the latest creation; it does not delete the saved short file.
CHAPTER 07 OF 08
Export & accounts
Finish your video and manage your plan.
Export a finished video
Create a file you can share or publish.
- Play the edit from beginning to end. Check gaps, missing media, text timing, audio, framing, and the last frame.
- Click Export and choose an available size. Free exports are 720p with an ArtsyCut watermark. Pro supports higher sizes within the account allowance.
- Select Create video and watch progress. Keep the app open. Use Cancel export if you need to revise something.
- Wait for Export complete. Locate the result in the chosen export folder, using completion actions when available or Windows File Explorer.
- Play the actual exported file before posting. Save the project too so you can make later corrections.
Check the finished file, not only the editor preview.
Export XML to another editor
Continue a Pro edit in another editing application.
- Use an active Pro account. Open Export > Continue in another editor - XML / FCPXML.
- Choose Filmora, Premiere Pro, or DaVinci Resolve for XML, or Final Cut Pro for FCPXML.
- Confirm every original file path and source frame rate.
- Read What transfers, then choose Export timeline. Keep the media accessible to the receiving editor.
- Import the result into that editor. Check links, cut points, speeds, titles, and transitions against ArtsyCut.
The receiving editor should find your originals and reproduce the intended cut.
Account, subscription, and help
Manage ArtsyCut access separately from AI access.
- Check the software version and plan label at the bottom right.
- On Free, use Upgrade near Layout or the File subscription option. On Pro, use Manage subscription.
- The management page handles profile and subscription choices. Purchases complete through Stripe and return to the account flow.
- Return to ArtsyCut and check the plan. If it has not updated, confirm the same account is signed in through the account controls.
- Use File > Help or Shortcuts for guidance. Contact ArtsyCut leads to the website contact page.
Your plan should match the account that completed the subscription purchase.
CHAPTER 08 OF 08
Troubleshooting
Find answers, shortcuts and editing terms.
Troubleshooting
Start with the smallest useful check.
- Missing media: reconnect the original through Relink media. Confirm the drive is connected and the file has not been moved or renamed.
- Slow scrubbing: pause, test a shorter range, and allow the requested frame to decode. Check whether one source file or effect causes the issue.
- Unexpected cuts: Undo, narrow the zone/range, and try less aggressive detection. Check the selected mode.
- AI connection trouble: check Codex installation and sign-in, then Check connection. Read the error; do not use an API key as a workaround.
- Missing controls: select the intended clip and tab. Check for locked tracks or a running task. Save and restart after updates.
Preserve your project before troubleshooting or reinstalling anything.
Keyboard and mouse reference
Use shortcuts when the timeline has focus.
- Space: play/pause. Left / Right: step one frame. Up / Down: navigate edit boundaries.
- Ctrl+A: select all timeline clips. Delete: remove selection. Shift-click: extend selection.
- Ctrl+Z: Undo. Ctrl+Shift+Z: Redo. Ctrl+S: Save. Ctrl+D: duplicate selection.
- V: Select. C: Cut. A: select forward. Shift+A: select backward. Z: Zoom tool; Alt-click zooms out.
- Mouse wheel: vertical track scroll. Zoom controls: time scale. Alt-drag: bypass snapping. Escape: cancel a supported gesture or stop hidden recording.
Know where focus is before pressing a destructive shortcut.
Glossary and final checklist
The language of a reliable first cut.
- Project: edit instructions. Source media: original recordings. Clip: a timed use of media. Export: a rendered video.
- Playhead / cut line: current time. Trim: change an edge. Split: divide a clip. Snap: align positions. Ripple: shift later timing.
- Keyframe: a value at a time. Transition: a blend at a join or edge. Effect: a visual treatment. Work zone: an area analyzed for activity.
- Before export: save, reconnect media, inspect gaps and joins, check sound, verify titles/framing, and confirm output size.
- After export: watch the file, keep the project and originals, and make a backup before moving or deleting media.
A useful first cut is clear, continuous, and easy to refine.